The Shongololo is a high performance fully molded composite Radio Controlled Glider with a hollow core sandwich wing construction.
As we own the molds for this model, we are able to use them to teach people the art of working with high tech composite materials. To do this we have created a building group where 4 people at a time work on the model over 10 sessions. The building group meets once a week and each person will get to build his own glider, while being taught how to work with advanced composite materials. The building group structure works in such a way that there is always a turnaround of people and each person first gets to help and learn on two other models before they get to build their own.
ALL MATERIALS MENTIONED IN THIS ARTICLE ARE AVAILABLE FROM
AMT COMPOSITES.
CALL THEM ON 011 392 4232
EMAIL: evan@amtcomposites.co.za
A series of post will follow this one dealing with all the different aspects of making this model glider.
The first will deal with the laying up of the wing.
 Molds polished and edges taped.
 Multiple thin layers of 2K paint. Allowing drying between coats.Ready for spraying.
 The first layer of 25 gram glass cloth is laid on.
  Molds painted and drying. Kept in the vertical position to minimise dust settling on the surface.
 The paint is allowed to dry for a minimum of 1 hour to a maximum 3 hours

Resin is then applied to the surface and squeegeed out using old credit cards.

All excess resin is squeegeed off.

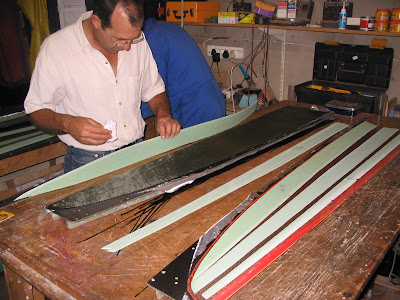
In the case of the Shongololo, we use a 71 gram Carbon/Aramid Hybrid cloth for the skin. Plain Carbon cloth can also be used depending on your requirements.
A template is used to cut this hybrid cloth to the exact shape of the wing, because if any Aramid is left sticking out of the finished wing it is very difficult to remove afterwards.
 Next, the hybrid cloth is applied and wet out over the 25 gram glass.
The 1.5mm thick Airex sandwich pieces are cut & chamfered all around.
Dust is carefully removed from the Airex before placing on the layup.
+cut+to+lengths.+50+for+the+top+and+40+.JPG)
For the F3B Shongololo there are 50 12K tows on the top and 40 on the bottom, forming the Spar caps.

The carbon tows are then inserted between the airex sheets and wet out one by one.

Care is taken to wet the carbon properly and removed all air bubbles. The airex sheets are also checked for alignment.

The inner 49 gram glass cloth skin, which completes the sandwich, is wet out on separate plastic sheets.

The shape of the wing is drawn on the underside of a plastic sheet as a guide and the glass cloth is laid onto it and wet out. (This is often referred to as a "Wet Preg".)
 Where necessary, local reinforcement is applied and wet out.
Then the wet-preg is transferred, on the plastic sheet, to the rest of the layup in the mold. The plastic keeps the glass cloth in shape.
Note the local reinforcements (hard points) for servos and in the root area already on the airex.

The plastic is then slowly peeled away.

Then the cloth is stippled down making sure not to disturb the alignment of the airex sheets.

Careful inspecting for alignment and trapped air bubbles.

Peel ply is then applied over the entire layup.
Not shown unfortunately, but on top of the peel ply, a layer of separator film is added and then the whole mold is wrapped in a breather cloth.


Then the molds are inserted into the vacuum bag.

This bag is big enough for two molds. So far just one in.

Once the molds are in, the bag is sealed and vacuum is applied and then the bag is checked for leaks and even distribution of vacuum. The layup is left to dry under vacuum for 24 hours.
Then the vacuum is switched off and the the molds are removed from the bag and the layup is left in the molds to dry for a further 6 days in a warm environment.
-------------------------------------------------------------------------------
That's it for the wing skin layup. The next series of photos will deal with how the wing skin halves are joined.
First a Joiner box has to be constructed.

The joiner is constructed over a split steel mandrel, show above. The two halves of the mandrel are tapered to aid removal form the inside of the finished joiner box.

Two layers of 163 gram glass cloth, cut at 45 degrees are wrapped around the mandrel and then the whole thing is wound in Aramid tows which squeezes the cloth tight. These Aramid tows are then wet out thoroughly.

This is left to dry on the mandrel for a few days.

When dry the mandrel is removed and the joiner box is carefully aligned and glued to the top wing skins in one piece. H9940 epoxy adhesive is used.
In the photo above the peel ply has been removed from the layup and the excess glass cloth trimmed flush with the molds at the root and leading edges.
 When the adhesive is cured the excess joiner box is cut off flush with the root of the wing.
The next step is to install the sheer webs.
But before this can be done they have to be made. The easiest way is construct pre-laminated end grain balsa sheets and then cut the sheer webs from these. For the main sheer webs, 3 mm balsa is sandwiched between 200 gram Carbon cloth which is orientated at 45 degrees. The hinge line sheer webs are made from 2mm end grain balsa between 163 gram glass cloth at 45 degrees.

The height of each sheer web is carefully calculated and then cut from the pre-laminated sheets.

The above photo shows the sheer webs prior to being glued in.
 Once again H9940 Epoxy adhesive is used to glue the sheer web in. Weights are used to hold them in place while the glue dries. Careful alignment is critical to a strong and true wing.
Now comes the joining of the two wing halves.
Before this can be done the molds are trial fitted together to check that they close properly and any high spots are sanded off the sheer webs.

Once it has been determined that the molds will close, a mixture of Epoxy, Cab-O-Sil, Cotton Flocks & Microballoons is made and put into a bank bag. Then the corner is snipped off and the goops piped onto the areas that will meet.

The goop must be just thick enough so it stays on the top of the sheer webs in a bead without running down the sides.

Again, H9940 epoxy adhesive is used on the joiner box.

Although it is not clear in the above photo, reinforcing "C" shaped pieces of Carbon/Aramid Hybrid cloth will be applied in the junction between the top skin, joiner box and bottom skin. These "C" are lying flat next to the joiner box in the above photo.
 Finally the two mold halves are mated together and bolted and clamped tight.
 A week later the bolts and clamps are removed and the molds twisted slightly to loosen the wing from the molds.
The molds are then opened to reveal the wing.
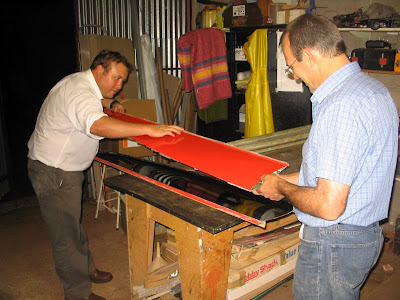
The owner (on the left) finally gets to see all his hard work revealed. All that remains is for the flasing to be removed. The root area is cleaned up and sanded square. A pre-laminated carbon root rib will be bonded on later on. In the photo below it can be seen.
The root area is cleaned up and sanded square. A pre-laminated carbon root rib will be bonded on later on. In the photo below it can be seen.
Above the control surfaces are having their whipers installed.
2 comments:
Hi Evan, as a matter of interest what airfoil are you using?
Reagrds
Ron
Composite Building Blog is really very useful blog for us. Thanks for sharing the such a nice blog with us!!
Composite Sheets
Post a Comment